Excel lovers, please, it’s time to move on. Start to import data on Stata and discover its wonderful distinctive features…
Good Afternoon Guys,
Last time we learned how to save our files in order to manage them easily any time we need them. Today we are going to discuss how to manage and input data into Stata. The first thing we have to know is that the software allows us to directly download source data from the web, import entire database from spreadsheets and text file and also recognizes other statistical format like SAS.
I suggest you to import raw data on Stata and then decide how to mine and clean them because there are several options we will discuss about to make this procedure easier and identify if there are values that Stata do not recognize. Moreover, you can keep track of your cleaning procedure by save all the manipulations made in a do-file and easily discuss them.
Import Data
A useful command to read comma separated (.csv) files and tab-delimited text files was insheet, you could either used it in its basic syntax or add the delimiter() option to specify which ASCII character was used as a delimiter. Moreover, you can directly open the menu and type File-> Import->Text data created by a spreadsheet. A new window where the command appear in the bottom line, insheet, will appear on the screen. Remember, as we said in the first lesson, you can either type directly the command or, if you don’t know its syntax, you can use the menu to find it out.
If you want to import a spreadsheet you can use the command Import excel. If you open it from the menu (File->Import->Spreadsheet), this window appears on the screen. Here you have to select a file (in .xls or .xlsx format) and select the worksheet and cell range. As you can see, the first four rows of my file were empty so I asked Stata to import data from the fifth row, selecting the proper cell range by hand.
If on the first row of my file there are the variables names, I can select the option Import first row as a variable name (firstrow option in syntax). If I want to import my data as string (text format for variables in Stata) I can directly select the option. In the next post, we will see why this file format is problematic and how to fix it.
The command appears on the Results window as:
import excel using Bloomberg.xls, sheet(“Foglio1”) cellrange(A5:C362)
N.B. Every option must be inserted in the syntax AFTER the comma!
Another easy way to import data from Excel is by directly copying and paste everything we need from one sheet in the data editor file, which icon is next to the data browser one. This procedure is also useful if you want to append data to already loaded dataset.
Finally, if you just want to import a subset of variables from an Excel file you can type:
import excel B C using Bloomberg.xls, sheet(“Foglio1”) clear
In this case, I decided to import the information contained in the following columns getting rid of column A.
Export Data
Let’s now say we created a file in Stata, we cleaned it and we decided to export it in excel in order to be used by another software. The command is exactly export excel. You can select which variables you want to export, you can specify time range (if year>= “1990”) and how missing values should be coded in excel. Indeed, in Stata they are usually reported with a point or with a number like -9, depending on the source of the data.
export excel idnum round1 round3 mwhite mhisp using “stataconverted”, firstrow(variables)
Again, if we want to use the top down menu to communicate with the software we have to type File-> Export->excel spreadsheet. You can select all the variables you want and assign a name to the newly created excel file. You can also specify the option first row and include if/in options and ones that are more advanced.
The last way to export several variables out to comma separated file is by using the outsheet command. If we do not insert the name of the variables we want, it writes all over (like export excel). It generates by default a tab separated file unless we specify the comma option.
outsheed idnum round1 round3 mwhite mhisp age using prova1.csv, comma
After this command, you can optionally add:
type prova1.csv
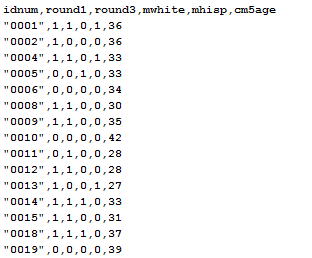
In order to see on Stata the output generated. I generated a file of the form:
In this case, all the variables were numerical but, in case I have only string variables and I don’t want their labels to appear, I can add the nolabel option so that the different labels are modified in different numbers.
Ready to manage your data? Check out the next post!


Hi folks! Thank you for all the info! Still I need to move from SAS to STATA several datasets in order to analyze them properly… How would you do that in a fast way? They’re quite a lot… Thanks in advance!
Hi Giovanni, thanks for your feedback, I really appreciate it.
In order to move a SAS file into Stata you can proceed in three ways:
1) Convert your SAS dataset into an excel file and then import this excel file in Stata with the command import excel I described in this post;
2) You can directly work on SAS and use a command named proc export which syntax is: proc export data=datatoconvert outfile= “C:\data\newdataconverted.dta”;
run. In this way you can find in your SAS directory a newly created dataset in .dta format;
3) Purchase or try a free trial month of Stat-Transfer and use this program to directly convert all your dataset or part of it from SAS to STATA (This program allows you to convert different kind of files). You only have to be careful if you want to convert value labels. In this case, you have to select the option “SAS value labels-reading” in Stat-Transfer Options menù, this is surely the fastest option if you have many datasets.
Ty very much Michela! I tried option 2 and it save my life! Thanks again!