When you deal with huge amounts of data, you must keep track of the commands used for the analysis. Storing data in Stata is easy…
Good morning Guys!
Our second lesson is very important for those of you that suffer of short-term memory.
As we said in the first post, Stata has a user-friendly way to interact with you. You can choose to save commands used in the session opened or the output obtained by typing these commands.
But we don’t want to rush over it, let’s make a preliminary step first!
Anytime you open Stata, I recommend you to type cd. Cd is a command that shows you in which directory of your computer the software is storing the output. If the directory chosen is not ideal for you, you can easily set up a new one by typing:
cd C:\Users\Michela\Desktop\Stata
from now on, all the files produced will be stored here.
Now we can go back to the main course of this lesson: saving output and commands. There are several methods to capture the output showed in the Results window. The first and more intuitive one is to create a new do-file.
The do-file is a file containing a list of commands for Stata to run. You can either open it by clicking the do-file Editor button displayed here
![]() or by typing directly doedit in the Command window. Then, in the window that appears in front of your eyes, you can start writing commands. Once you typed every command needed in the analysis you can save it so that, next time you need to recall it, Stata is able to directly run the file and execute each command in sequence.
or by typing directly doedit in the Command window. Then, in the window that appears in front of your eyes, you can start writing commands. Once you typed every command needed in the analysis you can save it so that, next time you need to recall it, Stata is able to directly run the file and execute each command in sequence.
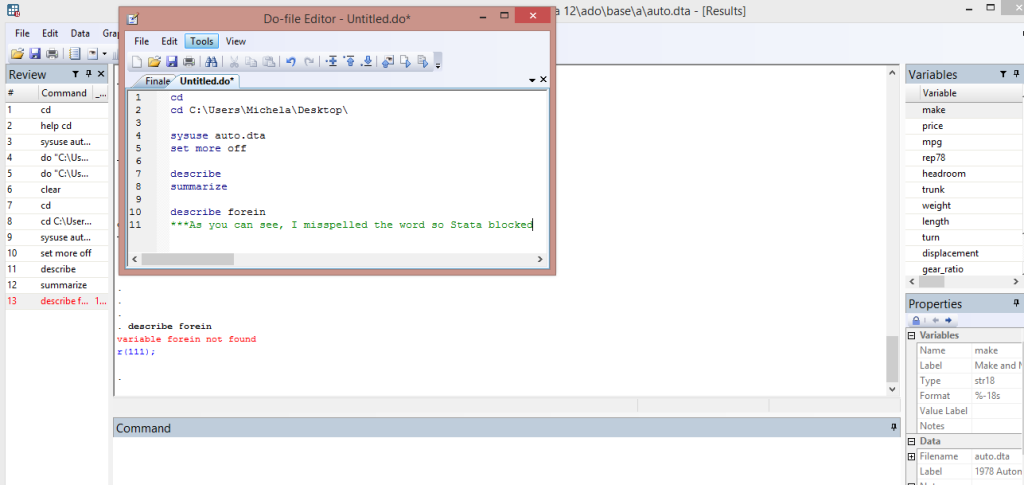
As you can see, I opened a new do-file and changed the directory. Then, I opened one of the example datasets included in Stata that is auto.dta, a sample of fuel usage for 1978 automobiles. You can open this file directly by typing:
sysuse auto.dta
or from the menu: File -> Example Datasets -> Example Datasets installed with Stata. Commands are reported in blue so that you easily recognize if you misspelled some of them. If you put an asterisk before the words, *, the text become green, indicating that Stata will not recognize these text parts as commands. This is extremely useful if you want to type the same commands with different characteristics. You can write them all, and using asterisk to postpone their run. You can also make comments.
set more off
This is an extremely useful command that must be called after you select a database to use in order to avoid that the screen will not be stuck in working.
I purposely misspelled the variable foreign so that you can see in the window below that Stata blocked the process and signaled the error incurred. The blue part, r(111), is a numerical return code to signal which kind of error occurred in the analysis, whereas the red part explain precisely what went wrong. As we can see from the menu opened in the do-file, we have several commands.
We already know some of them from Office. The last five ones are the unknown. The first three from the left are meant to create/remove bookmarks on the lines of file. They are useful if you need to move quickly within long do-files. The second to last shows the contents of the do-file in a Viewer window. Finally, the last one is the executor. It runs the commands in the do-file, showing them all together with their output. Pay attention that, if you have a text highlighted in the file, the button will run only the selected lines and not the rest.
The second method is to use a log file. This is a text file that captures all of the output you produced in a Session; from the time you open until you close the file, regardless of how much you did. When you call the command, you must decide a name for your log file that will be automatically saved, i.e. whatIdid.
log using c:\whatIdid.log
If you want to get the results directly as a word file, you have to add “txt” after the first command. That is:
log using filename.txt
Then, go ahead, open a do-file or create a new one and run all of your commands. When you are done, you can definitely close the registration file by typing:
log close
The results of your analysis will be saved in the log file named whatIdid. If you want to add new parts of the analysis later on, you can also insert the option replace:
log using whatIdid, replace
Or maybe, during the same session opened, you can decide to interrupt the record in the log file in order to make some attempt and check which is the right procedure to be saved in the log-file. In order to interrupt the record type temporarily:
log off
In order to restore it:
log on
The third and last method is to use the translate command that only captures what is on the Results window. Of course, this do not include all of the output of your Session but you can call it anytime (without being obliged to open it before you run the commands), in contrast with the log-file. It saves all the output you already produced in a text file that is stored in the directory. Translate works with a keyword @Results that indicates it has to save all the output already in this window. The full command is:
translate @Results myfile.txt
A file called myfile is automatically stored. Anytime you want to see it or recall it just write on the Command Window:
type mylog.txt
Everything will appear on the screen!


